The world is a little less bad ass today. Godspeed Mr. Shelby, and thanks for everything!
Story here.
Saturday, May 12, 2012

Saturday, April 28, 2012
Wow, has it really been so long since I've posted an update? I'm getting lazy.....
I have made significant progress with the brakes, suspension, fuel system, wheels, and tires. So much that I am intending to drive the car this weekend! :-)
I'll post the full story and lots of pics later this weekend.
I have made significant progress with the brakes, suspension, fuel system, wheels, and tires. So much that I am intending to drive the car this weekend! :-)
I'll post the full story and lots of pics later this weekend.
Sunday, February 12, 2012
I've made some good progress
No pictures yet, but I made some good progress this weekend with more to go.
My friend Mike came over to help me get the rear axle and springs out, which we did. My camera batteries were dead, so no pictures but they are charging now. I'll get pics as I reassemble.
We opened the rear end while we had it out. It was surprisingly clean inside with no apparent wear on the gears or bearings. The carrier assembly was gooped in with liquid gasket instead of a proper paper gasket, so I suspect that the previous owner may have done some updates or repairs, which is why it looked so good. We reassembled with a proper gasket, and scraped off about 30 pounds of road grime. I took a wire wheel in my drill to it last night to clean up the grime, and in the process took off some of the original finish. So for now, I sprayed flat black Rustoleum on it just to protect the bare metal. Sometime later I will take the entire axle to be refinished, but for now I just want to get the car on its feet and on the road.
We counted gear teeth, and found 44 teeth on the ring and 16 on the pinion, which means a 2.75 gear ratio. I have no idea what the car came with, but I will be putting lower gears in it. I'm guessing 3.5 or 3.73, somewhere around there, but have some time to do some research.
It's colder than hell, at least for Texas, but I'm going to work on it some more this afternoon with the goal of getting the new rear springs attached and the unit back in the car.
I'll post more later.
My friend Mike came over to help me get the rear axle and springs out, which we did. My camera batteries were dead, so no pictures but they are charging now. I'll get pics as I reassemble.
We opened the rear end while we had it out. It was surprisingly clean inside with no apparent wear on the gears or bearings. The carrier assembly was gooped in with liquid gasket instead of a proper paper gasket, so I suspect that the previous owner may have done some updates or repairs, which is why it looked so good. We reassembled with a proper gasket, and scraped off about 30 pounds of road grime. I took a wire wheel in my drill to it last night to clean up the grime, and in the process took off some of the original finish. So for now, I sprayed flat black Rustoleum on it just to protect the bare metal. Sometime later I will take the entire axle to be refinished, but for now I just want to get the car on its feet and on the road.
We counted gear teeth, and found 44 teeth on the ring and 16 on the pinion, which means a 2.75 gear ratio. I have no idea what the car came with, but I will be putting lower gears in it. I'm guessing 3.5 or 3.73, somewhere around there, but have some time to do some research.
It's colder than hell, at least for Texas, but I'm going to work on it some more this afternoon with the goal of getting the new rear springs attached and the unit back in the car.
I'll post more later.
Friday, February 3, 2012
Some minor set backs
I had most of the driver side suspension back in the car, but it just didn't look and feel right. The UCA us rubbing a bit against the shock tower. This can either be an installation error, or I have the control arm shaft backwards. I called John at Opentracker for advice, but only left a message. I hope to hear back from him real soon. Either way it will be an easy thing to fix.
The Global West adjustable strut rod, upon closer inspection, did not line up correctly either. I call Global West and spoke with Doug, who was extraordinarily helpful. The bottom line is the strut rods I have were not built for a 1971 Mustang, but a 1970 Mustang. To top it off, Global West does not build adjustable strut rods for a 1971 yet! Somehow there was some confusion when I ordered the parts from them.
Luckily the 1970 and 1971 Mustangs are very similar. All I need to do, in theory, is get a new spacer of the proper OD and thickness, and fabricate a bracket of some sort to keep the clevis from spinning. Again, like the UCA, this sounds easy. Doug will help me with the spacer, and I have some ideas on the bracket that I need to fabricate. Quite literally, another fun fabrication project.
The end result is I took all of the front suspension components back out of the car this afternoon. While I am waiting for parts and advice, I'll start on the rear suspension.
As usual, more to follow!
The Global West adjustable strut rod, upon closer inspection, did not line up correctly either. I call Global West and spoke with Doug, who was extraordinarily helpful. The bottom line is the strut rods I have were not built for a 1971 Mustang, but a 1970 Mustang. To top it off, Global West does not build adjustable strut rods for a 1971 yet! Somehow there was some confusion when I ordered the parts from them.
Luckily the 1970 and 1971 Mustangs are very similar. All I need to do, in theory, is get a new spacer of the proper OD and thickness, and fabricate a bracket of some sort to keep the clevis from spinning. Again, like the UCA, this sounds easy. Doug will help me with the spacer, and I have some ideas on the bracket that I need to fabricate. Quite literally, another fun fabrication project.
The end result is I took all of the front suspension components back out of the car this afternoon. While I am waiting for parts and advice, I'll start on the rear suspension.
As usual, more to follow!
Wednesday, February 1, 2012
Getting front suspension installed
Got to spend just a few minutes on the car tonight, but they were very productive. I got the lower control arm and strut rod on the driver side installed, and attached the spindle. I'm ready to install the spring, shock, and upper arm but I need to borrow or buy a spring compressor to finish the job. I'll get the tool tomorrow, probably going to buy since it would be a good thing to have.
So far I am very impressed with the Opentracker Racing upgrades. The original stock lower arm was sticky and hard to move. This new one moves in all dimensions very freely due to the spherical joint. Here is a video of it working. The Global West strut rod is already attached, which restricts the movement up and down, but I think you can get the point. Notice my daughter Alyssa is only using two fingers to swing the arm.
And here is a pic with the spindle attached. More to follow this weekend, when I hope to have the entire front suspension reinstalled.
 I also did some searching for wheels tonight, and I think I am going to go with the American Racing Mainlines in 16 x 8. What do you think?

So far I am very impressed with the Opentracker Racing upgrades. The original stock lower arm was sticky and hard to move. This new one moves in all dimensions very freely due to the spherical joint. Here is a video of it working. The Global West strut rod is already attached, which restricts the movement up and down, but I think you can get the point. Notice my daughter Alyssa is only using two fingers to swing the arm.
And here is a pic with the spindle attached. More to follow this weekend, when I hope to have the entire front suspension reinstalled.


Sunday, January 29, 2012
Start of reassembly
I am done with fabrication of front suspension parts, I think. It's time to start putting parts back on the car. Woohoo!
Starting on the driver side, I cleaned up all of the road gunk using a scraper and wire brush on my electric drill. It's not a perfect clean up job, but good enough to start reassembly. The full cleanup will come later after I completely disassemble the car. Good enough is good enough for now.
When I got through all of the gunk on the lower control arm pivot point, I discovered that the old bushing had started to work a hole into the mount. This part will need to be replaced later, but I think it will hold for now. You can see the wear marks in this pic on the left inside of the channel.
 The rest of the structure on this side seems sound. I have not started on the other side yet, but I suspect I will find similar damage.
I stopped work when the wife had my birthday dinner on the table, but before then I was able to reinstall the fuel line and brake line that runs through the driver side fender well. I also cleaned up the wheel hub and bearings. No pics of these parts since they are kinda boring.
I got to thinking during dinner that with this fuel line reinstalled, there's no reason why i can't fire up the engine. This week I will change the oil, get some fresh fuel, charge the battery, and she if the old gal still has some life in her.
More to follow!
Starting on the driver side, I cleaned up all of the road gunk using a scraper and wire brush on my electric drill. It's not a perfect clean up job, but good enough to start reassembly. The full cleanup will come later after I completely disassemble the car. Good enough is good enough for now.
When I got through all of the gunk on the lower control arm pivot point, I discovered that the old bushing had started to work a hole into the mount. This part will need to be replaced later, but I think it will hold for now. You can see the wear marks in this pic on the left inside of the channel.

I stopped work when the wife had my birthday dinner on the table, but before then I was able to reinstall the fuel line and brake line that runs through the driver side fender well. I also cleaned up the wheel hub and bearings. No pics of these parts since they are kinda boring.
I got to thinking during dinner that with this fuel line reinstalled, there's no reason why i can't fire up the engine. This week I will change the oil, get some fresh fuel, charge the battery, and she if the old gal still has some life in her.
More to follow!
Fixing cracks
Along with the upper and lower control arm fabrication, I did lots of little jobs to prepare for installation of the new suspension. These jobs are mostly cleaning, blasting, and painting an assortment of bits that need to be reinstalled.
Amongst these bits is a fairly large fabricated plate that sits high in the fender wells and boxes in the structure around the front coil springs. I have no idea what the proper name for this plate is.
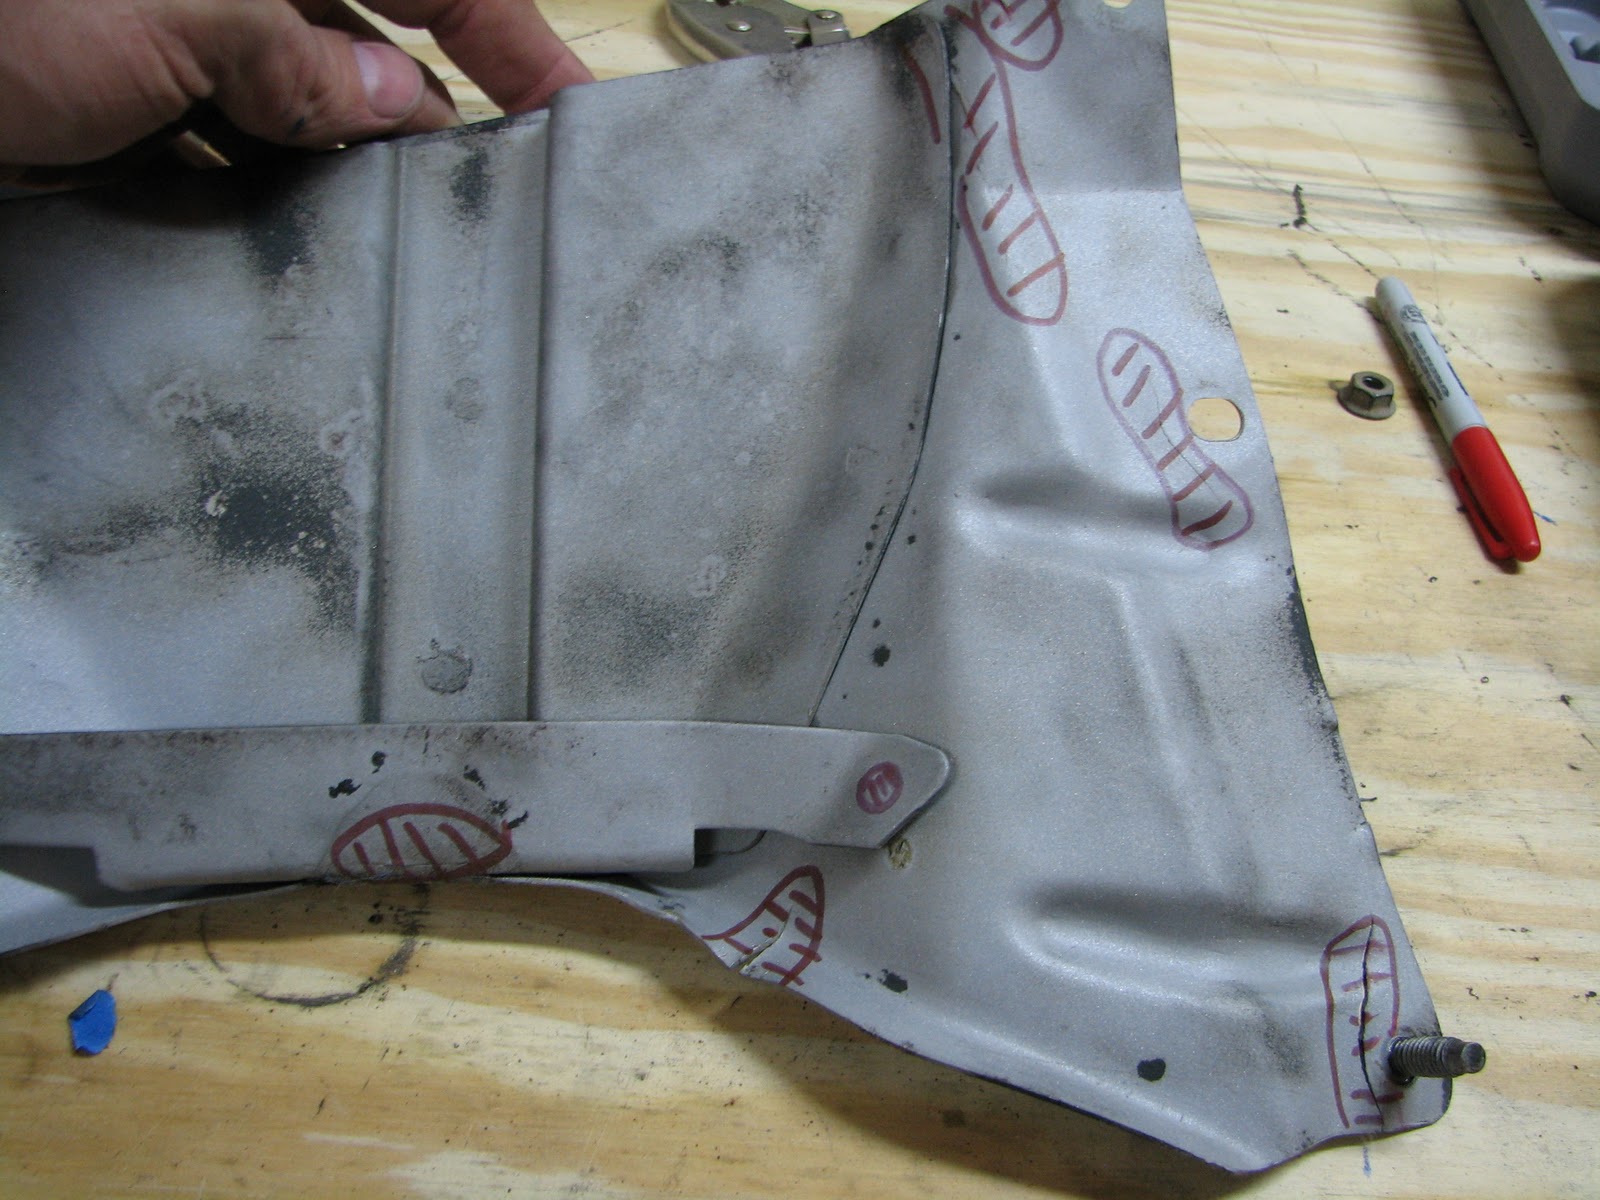
The plate on the driver side was straight forward - scrape off the accumulated road gunk, degrease, sand blast, and paint. No problem. The plate on the passenger side started the same, until it came out of the sand blast cabinet. Upon inspection I found six cracks and a broken spot weld.
Here's a pic. I marked all of the cracks I found with a red Sharpie.
 Here's a close up of the broken spot weld. You can see that the brace has lifted off of the plate.
 Upon closer inspection, I discovered that the spot weld on this brace did not break. In reality, when Ford put this together almost 40 years ago, they missed the spot weld. The spot weld is there, just not on the brace but about a quarter inch to the side. American quality control in the 70's! Therefore this brace was never welded. I suspect this is what caused all the cracks. Without the stiffness the brace adds to the plate, I suspect that the plate flexed too much which allowed the cracks to form. So I hope that welding the brace and welding the cracks will fix the problem.
I stop drilled all of the cracks, then welded along the cracks and closed the stop drill holes. I don't know if I really needed to drill the stop holes or not, but I did it anyway. Made me feel better if nothing else.
Here is the plate after welding. I used my Hobart Handler setting it on 2 of 5 and wire speed of 25. It seemed to burn through in most places, but I had to reweld from the other side in a couple of spots.
 After welding I ground down the welds, and used my bench mounted wire wheel for general clean up. Here's a pic after grinding.
 Here's the panel after painting.
 I think it turned out fairly well. If you look you can see where I did not do a perfect job with the grinding, but since this panel is well hidden up in the wheel well I won't worry about it. Besides, I am not doing a concourse restoration, so no one will really care.
Amongst these bits is a fairly large fabricated plate that sits high in the fender wells and boxes in the structure around the front coil springs. I have no idea what the proper name for this plate is.
The plate on the driver side was straight forward - scrape off the accumulated road gunk, degrease, sand blast, and paint. No problem. The plate on the passenger side started the same, until it came out of the sand blast cabinet. Upon inspection I found six cracks and a broken spot weld.
Here's a pic. I marked all of the cracks I found with a red Sharpie.

I stop drilled all of the cracks, then welded along the cracks and closed the stop drill holes. I don't know if I really needed to drill the stop holes or not, but I did it anyway. Made me feel better if nothing else.
Here is the plate after welding. I used my Hobart Handler setting it on 2 of 5 and wire speed of 25. It seemed to burn through in most places, but I had to reweld from the other side in a couple of spots.


Subscribe to:
Posts (Atom)